Yes, you read that title correctly. These cupcakes are SO delicious! And I was surprised at how quickly I finished them.
For the cupcakes:
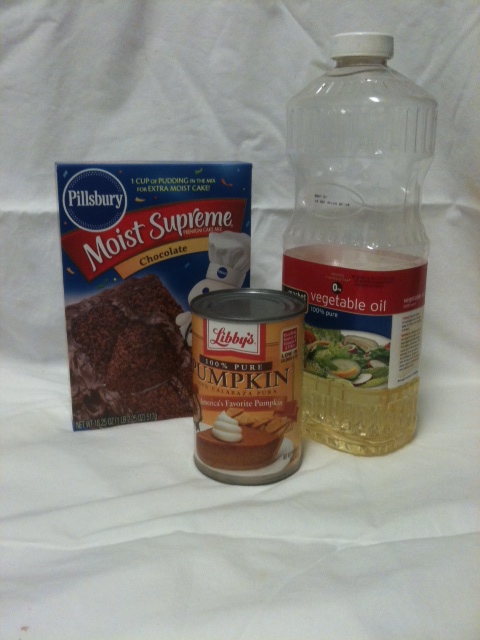
Ingredients:
1. Box of chocolate cake mix. Any brand will do. I picked the cheapest.
2. A can of pumpkin.
4. Oil.
5. Water.
Step One
Preheat oven to temperature called for on box's direction (most likely 350). Empty cake mix into a bowl. Add water and oil as called for in cake mix's directions. Add about 2/3 of the can of pumpkin. I've never really measured it out, so eyeball it. It's replacing the eggs, so imagine how much pumpkin could fill three egg shells.
Mix it all up until all of the lumps are out.
Step Two
Fill the cupcake liners. Since this is a dark batter, I suggest saving your cute liners for another time. You won't be able to see any patterns or designs. I went with foil liners this time.
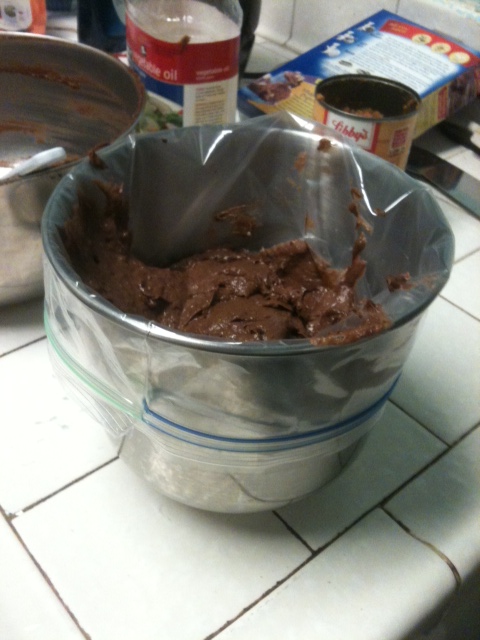
I have a trick that I use to fill my cupcake liners. I put a gallon-sized zip top plastic bag inside a bowl (experiment to find the right size, but I use the smaller bowl that came with my stand mixer) and turn the top over the edges. Then I use a rubber spatula to get all of the batter inside the bag.
Now, close the top. Make sure it is completely closed or you will have a huge mess. I am speaking from experience here. Cut off one of the corners about a half-inch from the tip of the corner. Now squeeze the batter through the hole into the liners.
Obviously use two hands, but my other hand was taking the picture. This is essentially like using a piping bag, only easier since it doesn't have to be pretty. Using this technique, you can avoid dripping the batter on the muffin tin and edges of the liners.
Step Three
Using a small off-set spatula, smooth over the tops of the unbaked cupcakes. This batter will not bake like batter following the box's recipe. It will maintain any imperfections once baked.
See how mine still had a peak once smoothed over? It turned into a
baked peak. I should have taken a picture before frosting them so you could see. Boo. Since I knew I was going to put candied bacon on top, I wasn't too concerned, figuring I could cover up the peaks.
Step Four
Bake as directed on the box's directions. Don't forget to rotate them half-way! I always bake these for the longest recommended time. If it says 18-22 minutes, I check after 20, but end up putting them back in for another two minutes. Sometimes even a minute or two longer. A toothpick inserted in will never come out completely clean until these are waaaaaay past overdone. If what comes out on a toothpick looks undercooked, another few minutes is needed.
Let them cool in the muffin tin for about 10 minutes before transferring them to a cooling rack. Cool completely before frosting.
In the mean time, get crackin' on the candied bacon!
For the candied bacon:
Ingredients:
1. Uncooked bacon.
2. Light brown sugar.
Step One
Preheat the oven to 425. Line a jelly roll pan (cookie sheet with all four sides raised) with foil. Place an oven-safe rack on top. Spray the rack with non-stick cooking spray.
I got this rack at Target specifically for candied bacon. My only other oven-safe rack (a cooling rack) won't fit in our little oven.
Step Two
Assign one hand as the bacon hand and one hand as the clean hand. Using the bacon hand only, put bacon on the rack, making sure the slices do not touch each other or hang over the edge. If they hang over, you will have a mess in your oven and a house full of smoke. Experience again, there.
Using the clean hand, put some brown sugar into a bowl. Using your bacon hand, scoop some brown sugar out of the bowl and cover each slice of bacon with it. Pat the brown sugar down so it adheres well. If you run out of brown sugar in the bowl, use your clean hand to scoop some out of the box/bag and put it into the bowl. The purpose of assigning the hands is to prevent cross-contamination into the box/bag of brown sugar. You really don't know how much you will need until you're done.
Throw away any brown sugar left in the bowl once you are done covering the yummy delicious bacon with yummy delicious sugar.
Step Three
Put it in the super hot oven for 10 minutes. Check on it. If it's not done, add another 2 minutes.
Let it cool completely. I put mine in the fridge to speed it along.
Step Four
Cut it into the size you want on the cupcakes. I did little strips about a half inch wide.
For the cream cheese frosting:
Ingredients
1. 1 pound powdered sugar.
2. 1 stick unsalted butter.
3. 1 8-oz. package of cream cheese. Don't use the low-fat version. It will make a really runny frosting.
Step One
Using an electric mixer, cream together the butter and cream cheese until it is light and fluffy. Scrape the sides of the bowl as needed.
Step Two
Add the powdered sugar a quarter-cup at a time. Wait until it is all incorporated before adding more. If it is too dry, add some milk, one teaspoon at a time, until you are happy with it. I didn't need any milk today.
That's it! Time to decorate!!
Cream cheese icing doesn't hold its shape well since it is so soft. Because of this, piping it on it completely pointless. It will end up oozing all over and all of your hard work will be unnoticed. So go old school and just slap it on with a small off-set spatula and smooth it over. Then top with your candied bacon pieces. I also added a little more brown sugar to snazz it up a little.
Eat up and enjoy!