And here is how you can do it!
Supplies
1. Foam tube from the plumbing department of a hardware store (it comes in five-foot segments or something like that).
2. Duct tape.
3. Scissors.
4. Yarn in two colors, one skein each.
5. Glue gun.
6. Stiffened black felt.
7. Light-colored chalk.
8. One sheet of paper.
9. Wreath hook.
Step One
You are going to use the foam tube and duct tape to make the wreath. It is SO much cheaper than buying a premade foam wreath! Of course, if you want to use a premade one, go ahead. It will make your life easier. Trust me.
Play around with the foam tube until you find a length that will work to make a good-sized wreath for you. I didn't measure mine (sorry), but different people like them to be different sizes. Just know that this won't work for one too small.
Cut it the length you decided on and duct tape the ends together.
Next, thank me for doing this before you so I can tell you the issues I had and how I figured to best deal with them.
My circle was not so... circular. There were two very noticeable kinks. I put some duct tape around them and it stiffened them up so they didn't kink anymore. Problem solved.
I left my wreath alone for about an hour to run an errand and returned to the ends trying to escape from the duct tape. So I wrapped it some more. I put pieces about eight inches long criss-crossed across the two ends so they could pull from opposite directions. Problem solved.
While I was handling the wreath to wrap it, I had to be very careful so I didn't squeeze it anywhere and create more kinks. Next time I make one, I will wrap the entire piece of foam in duct tape to make it sturdier. Future problem solved!
Step Two
Adhere the base-color yarn (mine was the orange) to the back of the wreath. I just used duct tape for this.
Now wrap... and wrap... and wrap... and wrap. This took awhile, but not as long as I expected. Since I was going for a bit of a sloppy look, I just threw the skein inside the wreath and back out the bottom a few time and then pushed those wrappings to meet the others.
Once you wrap it all the way around, adhere the yarn to the back of the wreath with hot glue and cut it once it cools.
Step Three
Adhere the top-color yarn (Mine was the gray) to the back of the wreath with hot glue. Once it cools, begin wrapping again. This part was more tedious since you can't just push it to meet the rest of the yarn. Try to find your own rhythm. I purposefully wrapped bits in all sorts of directions so it looked a little messier, but still neat.
Once you meet the beginning, adhere the yarn to the back with hot glue. Once cool, trim the end off. Lots of yarn left over for other projects!
Step Four
Draw some bats on a sheet of paper. I just did a google image search for clip art bats and traced one I liked. Try to find a few different sizes. Cut out the bats.
Step Five
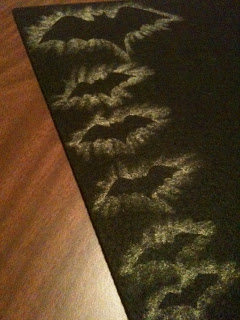
Use the chalk to outline the bats on the felt. This was a little tricky. I held the paper down at the edges and kind of...drew lines that started on the paper and ended on the felt? I don't know how to word it. Look at the picture and you'll know what I mean.
Looks like the Bat Signal. =)
Now cut 'em out!
Step Six
Arrange the bats on the wreath to figure out how you want them. Make sure there is no chalk visible! Now just hot glue them on, let it cool, and hang it up!
I also wrapped my wreath hook with orange ribbon because the gold was just not jellin'.
I plan on making more like this for other holidays and seasons. Obviously not bats. It will be easy to change up the colors and add some felt roses, felt leaves, or whatever else you can think up.
Happy crafting!


