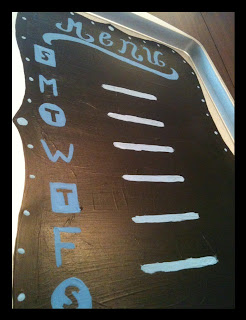
1. Mini cookie sheet ($1 @ Dollar Tree)
2. Chalkboard paint (~$7 @ Michael's... although I used my 40% off coupon for it, woohoo!)
3. Chalk ($1 @ Walmart for a 12 pack of colored sticks)
4. Various paint colors (I used two colors, $1 or $2 each @ Walmart)
5. Paintbrushes (You probably have on hand, but you can buy a big variety pack for $5 at Walmart)
6. Some sort of adhesive or mounting system (Mine was $3 at Walmart, but you could screw it into the wall or hot glue a ribbon to the back)
Total spent: Eh, I'll say around $11, but the paint will be used for many other projects as well. I'm considering this a $4 project, just because of the cookie sheet and adhesive.
Step One
Thoroughly wash and dry your cookie sheet. Mine was a little bent since I bought it several months ago with the intentions of putting it in the house area at work for the kids to play with, but I knew/hoped it would flatten out once it was mounted on the wall (and it did!).
Step Two
Do your first coat of chalkboard paint directly on your squeaky clean cookie sheet. Use a small brush to paint the edges of your design and a larger one to paint the middle. Make it as even and un-lumpy as you can, but I guarantee you will see brush strokes on the finished product. I think it gives it more charm, though. =)
If you want, you can of course cut out the shape you want to paint from a piece of paper and then outline it on the cookie sheet with a black permanent marker. That would give you a chance to make sure it is perfectly as you want. I was pretty confident in my ability to wing it, though.
Step Three
Wash your paint brushes out so the paint doesn't dry in them. Oh! I forgot about my new trick! I didn't have a paint tray and didn't feel like buying one. Figured I'd jimmy something up once I got home. So I took a small plate and covered it in foil. When I washed out my brushes, I simply removed the foil and tossed it. Before the next coat, I covered it in a new piece of foil. This way, I didnt't have to wash it and the fresh paint didnt't mix with the sticky or dry paint. Made my life so much easier!
Okay, so your paint brushes are now drying. Let the first coat of paint dry on the cookie sheet completely for at least an hour.
Once dry, do a second coat, paying close attention to the edges.
Step Four
Repeat step three. Wash brushes, new foil, let paint dry for an hour.
Third coat. Again, pay close attention to the edges. Three coats was all I needed. Let this last coat dry for another hour.
Step Five
Details! Using any color you'd like, paint whatever design you want on it. I chose two shades of blue to match the rest of the kitchen. Bright colors look really good on chalkboard paint, btw. =) You don't have to use the design I did, but if you do, start with a dotted border. Then a title. Then the letters for the days of the week. Then lines to separate the days' foods.
While doing the details, I realized it would have been a lot easier/ more professional looking if I had bought some paint pens. Alas, I'm cheap. Doing it by brush worked fine for me. But if it's that important to you and you don't mind spending some extra dough, paint pens would be easier.
Step Six
Following the directions on the chalkboard paint bottle, wait at least 24 hours before using this. Then, lightly color the whole chalkboard part with chalk and wipe it clean. I guess this conditions it. While you are waiting, you can flip it over and work on whatever system you are going to use to mount it. I used little Command sticky tag things. It's essentially like Velcro that is sticky on the back, only this will come off the wall cleanly. I was happy to find it! If it was cheaper, I'd use it in my classroom as well. Our walls are terrible for staples and tape. =\
Step Seven
After you've waited 24 hours, hang it up, write your weekly menu, and enjoy! Now you and the rest of the family know what to expect and you can see what you need at the grocery store.
Did I mention it's magnetic?


This is pretty cool! :D
ReplyDelete